
Their collection includes a c. 1910 Chitarra, pictured.
Copyright © 2003, 2004 Dave Bayer. This page is www.math.columbia.edu/~ bayer/Chitarra


La Chitarra A pasta guitar (or Chitarra) is a frame strung with music wire, used to cut fresh pasta into strands. Chitarras originated in the Abruzzo region of Italy. One rolls out pieces of pasta dough by hand, places each sheet of fresh pasta on the wires, and presses the sheet through the wires with a rolling pin. The cut noodles are then tossed to separate, and set aside briefly before cooking.
Relaxed dough It is essential to let pasta dough rest for an hour or so after hand kneading, to yield a soft and easily rolled dough. Particularly if the flours have been freshly stone milled from whole grains, it is also essential to sieve out the bran, use some liquid in addition to the eggs, and let a stickier dough rest for half an hour to hydrate before kneading and working in a bit more flour. Otherwise, making pasta completely by hand is far easier than any book makes it out to be. Books are equally unnecessary for dough recipes: flour, water or other liquid, eggs or yolks, perhaps salt or oil; get the consistency right and the balance of ingredients can be improvised as easily as making salad. Having mastered this technique, one can now make fresh pasta as a guest in any kitchen, for pasta cut with a knife has its own separate appeal.
Laminated pasta The prevalence of hand-cranked pasta machines conveys an authority on them that they don't deserve. Their product is called laminated pasta, which sums up in one word everything I don't like about them, and why my pasta never tasted like the Italian reference pasta of my imagination. A pasta machine is fussier than a Chitarra: The repeated folding and rolling doesn't scale well as a satisfying task, in comparison to kneading, knife work, or even shaping dumplings, where one has more freedom of expression. Rolling pasta by machine is simply boring. Machines offer only a few discrete choices for final thickness, but absolute uniformity is an illusion; like a wood drill, they produce variable results depending on tension and feed rate, a fact exploited by chefs and piano builders alike to exert more control.
"It's just pasta"After rolling by machine, laminated pasta must be set aside for an exacting interval before cutting, a potential trap for the multitasking chef. Even obeying what appears to be a proper interval, the cutting itself feels like mangling the pasta and may go poorly, in which case one is out of correction opportunities, other that cooking the mess immediately and muttering "It's just pasta." Various friends have mastered this process out of a love of fresh pasta, but I believe that I have fairly described what they have overcome. More friends who are excellent cooks have given up on fresh pasta, for all of these reasons. Laminated pasta is easier than I make it sound, but cookbooks have little interest in painting this side of the picture.
Chitarra advantages In principle, it is far easier to make pasta by hand kneading and cutting with a Chitarra. It is a less time-consuming, more forgiving and a more satisfying process that makes cleaner cuts, and the results have a superior texture. Rolling out the dough with a rolling pin, one can roughly achieve any desired thickness through careful attention to hand feel. The pasta has been through much less abuse, only that of hand kneading before a relaxation phase. The time constraints are multitasking-friendly, as in "rest the dough long enough" or "cut the sheets soon after rolling", which incidentally saves looking for a good place to cache them. To be fair, the lessons learned from working by hand transfer well back to a pasta machine, but if a Chitarra or a decent knife is available, the pasta machine quickly feels cumbersome and superfluous. I only use my pasta machine as an option for rolling out the dough, after kneading by hand and before cutting by Chitarra.
Loose wires In practice, however, currently available Chitarras are made to be sold "a buon prezzo", and are rather poorly executed, with global tension controls but no provision for adjusting individual wire tensions. A few wires become looser than the rest, and what should be a quick process unravels into frustrating sessions of futzing and tweaking, getting the last few strands of pasta from each sheet to fall through. One can learn to love futzing and tweaking, but not if the inner toolmaker recognizes a faulty machine. Replacing the Chitarra is an ideal woodworking project, within reach to anyone who can locate a hand drill.

Steal Before re-engineering any design, one should ask, "Who else has faced these same issues, and can I appropriate their ideas?"
Zither pins While one can't improve farfalle pasta by studying butterflies, one can improve a Chitarra by studying musical instruments. Dulcimers are an ideal reference design. Dulcimers use zither tuning pins, the smallest readily available hardware that is specifically designed for adjusting wire tension. At a diameter of 0.198" and a price of 20 cents each, they work well for a Chitarra. Similarly, music wire may seem like overkill at first, but it is in fact the only suitable wire for a Chitarra; music wire is also widely used to cut cheese.
Music Now, a working musical instrument is within reach. A pleasing tone quality facilitates adjusting the strings; one can match pitches to far greater accuracy than one can match string tensions by feel. It is a nice surprise that by designing a Chitarra to be a functioning guitar, one can then achieve a uniformity of string tension to a closer tolerance than can be detected while making pasta. This is good engineering, when imperfect components conspire easily to achieve perfection where it counts.
Oops! Unfortunately, I gave the design little more thought than the above musings before hastily knocking off my first prototype. It was a big step forward in actual use, but I am deeply chagrined by the issues it revealed. This is a tolerable way to work if one is willing to make a number of drafts, but it wastes less time for the first few drafts to be carefully contemplated drawings. One should see comedy in the above sequence of pictures. These notes are to help you think through the design issues before you start, so you can get your Chitarra right the first time.
Corner joints Having the sides on the outside, rather than having the front and back on the outside, is simply dumb. Eight serious screws in hard maple turn out to be no match for 36 strands of #5 music wire tuned to middle C. The frame twists so badly that tuning the strings on one side pulls the other side out of tune. A day later, the strings are too loose to cut pasta, and the prototype invites unflattering comparisons with the Leaning Tower of Pisa. These Chitarras endure more powerful and lopsided forces than anything else I have built at this scale; they need to be designed to handle these forces. There is a corresponding reward for over-engineering the design, as the second prototype attempts to do: better tone quality.

Dovetail joints? Screws make it easy to finesse the corners into shape with slightly warped wood, but a butt joint provides no long-grain to long-grain glue surface, and so should be left unglued. One might instead be attracted by the idea of making dovetail joints; see How to Hand Cut Dovetails to get started. Screws, however, are much easier and require fewer specialized tools. If you can live with yourself after accepting this compromise, you'll be back in the kitchen sooner.
Wire ends One needs a plan for the wire ends. They're sharp, they hurt, and one breaks wires while awkwardly stringing the Chitarra. Dulcimer makers have some very specific ideas on how the wire ends should wrap around the tuning pins, ideas that I was unable to execute with my cramped tuning pin spacing. For the second prototype, I drilled a tiny wire hole through the tuning block next to each zither pin, and fed each wire end back through the block after going through the pin. Now, the design assists in neatly winding wire from both directions around each zither pin, for a twice as secure binding with no loose wire ends. Less futzing translates into less metal fatigue; I haven't broken a wire since.
Hitch pins On the other end of the Chitarra, my first prototype has 18 hitch pins, also standard dulcimer hardware and very attractive. Each wire wraps around a hitch pin and doubles back to become the next guitar string. This saves tying ornate loop ends on each string as some advise, and is an elegant expediency also adopted by some dulcimer makers. They do advise angling the hitch pins to keep the wire flush, as I belatedly realized; stringing the Chitarra became a comic nightmare, like one of those miniature puzzles where you have to get 17 beads to rest in their dimples at once. My wire kept flying off the hitch pins; the geometry of the Chitarra probably makes this a greater problem that it would be with a dulcimer. For the second prototype, I simply drilled tiny wire holes in back for each string, and the wire doubles back like stitching. Collectively, the wire holes front and back are like many tiny helper hands, assisting to make stringing the Chitarra a far more pleasing experience.
Pin layout Finally, the tuning pin layout on the first prototype makes for good separation between holes, but confusing tuning. The wood isn't going to split, but the primary cause of broken wires in use is tuning the wrong string. For the second prototype I went for a more ergonomic, easily deciphered tuning pin layout. In the final plans, the string angles to the pins provide phase cues, in addition to keeping the strings from rubbing against other pins.
Brass bridges I had one good idea while improvising the first prototype. Concerned about my uneven cut depths while filing guide grooves for each wire, I also filed grooves the other way, to hold brass rods to serve as bridges for the strings. This guarantees that the strings all lie in a perfect plane, again to a closer tolerance than can be detected while making pasta. As a bonus. this gives the Chitarra a much cleaner tone quality, as is obvious to instrument makers.
Algebraic geometry In a nod to Italian algebraic geometry, slight manufacturing errors actually make this a quadric surface. The good news is that perpendicular to the obvious family of lines formed by the strings is a second, invisible family of lines that the rolling pin can follow. This is exactly like a board that is flat in length and width, but twists.

Printing These plans can be printed exactly to scale, though doing so could be the crux of the project. Turn off duplex printing, which stretches the paper. Configure page setup for landscape mode for the actual printer that will be used, rather than using a conservative page setup suitable for any printer. Find and reject all well-intended PDF viewer assistance of the form "shrink to fit". Measure twice, cut once. (The file can also be edited in Adobe Illustrator, after extracting individual pages using Adobe Acrobat.)
Stringing This is much easier to do than to say, but some finesse here allows the use of finer wire without breaking. These directions are optimized for a Chitarra, and are decidedly not how one strings a dulcimer: Make sure that the hole through each zither pin is at least 1/4" above the wood, and oriented up-and-down. More than 1/4" is ok; the goal is to keep the holes from ever disappearing into the wood after tuning. Measure generous 5' lengths of wire by counting laps as you unspool. Thread the two ends through a pair of wire holes on the inside back wall of the Chitarra, pulling them back and away from the Chitarra like shoelaces, to even lengths. Pull tight, but don't fuss further with the stitch; flattening it now will just make kinks that weaken the wire and keep it from pulling tight on its own during tuning. Leaving the second wire end dangling for now, bring the first wire end up and over the Chitarra, over the brass rods and forward to the front, and feed it down through the hole in its zither pin, then back through the corresponding wire hole. It is easiest to negotiate this last tight turn by making a loop, but one should then untwist the loop and keep it untwisted between pinched fingers, to avoid creating a kink as the wire is pulled through. Grab the wire end with pliers, and pull the wire through until there is a few fingers width of slack above the Chitarra. To abuse the wire as little as possible, be careful not to overshoot. Too much slack, and the zither pin hole will disappear below the wood before the wire pulls tight. Too little slack, and the wire could conceivably not wind enough around the zither pin; it takes very little to secure the wire, however, because the wire is winding around the pin from both directions. Trim the wire end for now so that a few inches sticks out into the interior of the Chitarra; leave enough to grab onto after it pulls shorter during tuning. Make sure that the wire is seated in the correct grooves front and back, and lift up on the wire to provide finger tension before tightening the zither pin. Too little finger tension will yield a sloppy wind, but too much finger tension will create a tight kink at the zither pin hole, weakening the wire. It is best to start a bit sloppy, and pull tighter once the wind is established. Now take out the slack by tightening the zither pin with a tuning wrench. Tune tight enough to secure the wire in the correct grooves, but not tight enough to pull the loose end through the holes in back. Now repeat with the other end of the wire, then tune both wires at once to the desired pitch. Now trim the wire ends flush with the inside wall of the Chitarra, first grabbing what remains of the wire ends to keep them from flying into your eyes or across the room.

Dimensions My Italian Chitarra has wires spaced 5.12 per inch on one side, 8.57 per inch on the other. A typical hand-cranked pasta machine produces sheets of pasta at most 5.5" wide. A typical Chitarra has a cutting area of 6" by 15", sufficient to cut machine-rolled pasta. When hand rolling, one more easily ends up with wider and shorter sheets to cut. I'm not superstitious about the length of my noodles, and I actually prefer how shorter noodles handle, but making the Chitarra longer costs little in time or materials, only in storage and aesthetics. A 10" long cutting area is impractically short. The width of the Chitarra, on the other hand, determines its expense in every sense. Wider is a luxury, but for home use two different 8" wide cutting areas is far more of a luxury than one 16" wide cutting area. A restaurant, on the other hand, might do well to commission several massively oversized Chitarras, including one in a nicer wood for show. Using reclaimed wood and brining the metal parts, one could make a faux antique.
1x4 boards Each of my plans is for a cutting area one string shy of 7" wide, or one string shy of 8" wide, to keep the string counts even. My plans are for 1x4 boards, 0.75" by 3.5" finished dimensions. My first prototype used 1x3 boards, which are appealingly lighter, and would suffice for 6 or fewer strings per inch. I make my sides 1/2" lower, so the strings can flex without the rolling pin banging into the sides, and so I can reach under with my fingers. The strings in fact flex far less than this; a clearance of 1/4" would do fine, although the rolling pin might sometimes touch the sides. Lacking facilities to saw or plane 1x4 boards, in the worst case one could simply raise the front and back a bit when forming the corners.
Wood selection Hard maple is a classic choice for instrument tuning blocks and is the most practical choice for a Chitarra. Maple is widely available in ready-to-use 1x4 boards. Other woods won't stay in tune as long, but the tuning pins will grip in any wood, and are hardest to insert in hard maple. Choose an attractive hardwood that is food-safe; as a general rule these are the trees that produce food, such as fruit or nut trees. Choose a wood that is not unduly difficult to machine; hickory for example is beautiful but very hard on cutting tools. Cherry is an ideal candidate, with a beautiful color that deepens through red and brown over time, and has been a traditional furniture choice in my region for centuries.
"To fit in the car" Buying exotic hardwood is a two step process, as most dealers sell such wood in irregular widths surfaced two sides only, and cut "to fit in the car". They are fiercely proud of their inability to cut within 10 degrees of a right angle. Without a full workshop, one needs to somehow cajole one's way past this bottleneck. For example, smart cabinet makers may be happy to clean up such boards for a pittance as a courtesy; I referred thousands of dollars of cabinet business to one after I was impressed with their workmanship. Alternatively, some internet sources cater exactly to this need, and sell hardwood cut to order. This is the easiest way to go. However, a good craftsman can turn rough stock into finished boards using only hand tools; if one has an enduring taste for hardwood, this could be worth learning. For an introduction, see The Seven Essentials of Wordworking, by Anthony Guidice, Sterling Publishing Co., 2001, ISBN 0806925272.
Wood strength There are some rules of thumb that inform the design of bookshelves, tables and such, that are equally relevant to building a Chitarra. The weight of books on a bookshelf presents a similar problem to the pull of the music wires on the ends of a Chitarra. For a given load, a shelf will sag proportionately to the cube of the distance between shelf supports, so doubling the distance between supports will increase the sag by a factor of eight. However, for bookshelves and Chitarras alike, the total load also increases proportionately, yielding a factor of sixteen. Making the shelves deeper increases their strength proportionately, but making the shelves thicker increases their strength by a similar cube law: Doubling shelf thickness makes them eight times as strong. This is why the classic apron design for a wooden table is so effective, and why steel I-beams are an efficient use of materials. For purposes of building a Chitarra, "5/4 rough" hardwood for the frame ends will be over twice as strong finished as "4/4 rough". To scale a design that is already at its limits, e.g. to build an oversized, tightly strung and tightly spaced Chitarra for a restaurant, one needs to more than double the thickness of the ends to compensate for a doubling of the width of the Chitarra. There's a reason that pianos are so solidly built.
Bowing Rockler.com has made it easy to develop an intuition for the magnitudes of these effects using real woods, by posting The Sagulator, a shelf sag calculator. A Chitarra with an 8" wide cutting area consisting of 64 strings each under 20 pounds of tension is the same problem as a shelf slightly over 8" wide bearing a uniform load of 1,280 pounds. If the ends of the Chitarra are made of 13/16" by 3.5" black cherry, then the initial sag is estimated to be about 0.04", increasing again by half over time. Increasing the thickness of the ends to 1" decreases the computed sag to 0.02". Instead doubling the width of the Chitarra, the computed sag increases to 2/3rds of an inch, which is unacceptable. In designing a Chitarra, bowing of the frame is always a significant concern.
Splitting Wood consists of strong fibers, held together weakly; this is why wood splits. Our Chitarra strings are attempting to lift apart the wood fibers, as if the ends were stacks of pancakes. For this reason it is more important to divide the zither pins and wire holes into many rows, than to maximize the distance between them. Wood's vulnerability to splitting is measured by its Tensile Strength Perpendicular to Grain, as defined in Wood handbook - Wood as an engineering material: "Resistance of wood to forces acting across the grain that tend to split a member." Hardwood Information Center also gives values; cherry is somewhat weaker than hard maple or walnut, with a value of 570 pounds force per square inch. Using this value, a row of zither pins spaced every half inch in 13/16" cherry leaves 0.25 square inches of wood to restrain each wire, which under ideal conditions is predicted to split at 140 pounds force per wire. However, just as a screw in too tight a hole will split the wood, the zither pins themselves are exerting pressure that should come out of this budget. Spacing the zither pins every inch leaves 0.65 square inches of wood restraining each wire, which is predicted to split at 371 pounds force per wire. The wire will break well before this point; splitting need not be a significant concern.
Screw strength Wood handbook - Wood as an engineering material gives the formula
Dovetail strength See Dovetail Test Results to see how dovetail joints fail under strain testing, glued and unglued. In short, long-grain to long-grain glue surfaces are stronger than wood, and glued wood joints fail by shearing apart. Wood's vulnerability to shearing is measured by its Shear Strength Parallel to Grain, as defined in Wood handbook - Wood as an engineering material: "Ability to resist internal slipping of one part upon another along the grain." Again, Hardwood Information Center also gives values; cherry is stronger than walnut but weaker than hard maple, with a value of 1,700 psi. For comparison, Titebond II yellow glue has a shear strength of 3,750 psi; see The Truth About Polyurethane Glue and Everything I Know About Glue for discussions comparing various wood glues. With 0.75" thick stock, each tail in a dovetail joint offers 1.125 square inches of resistance to shearing, or roughly 1,900 pounds force for cherry, over three times the strength of a screw. The tails and pins are unlikely to pull or tear out unless they are very small; wood's Tensile Strength Parallel to Grain is conservatively estimated by its Modulus of Rupture, which is 12,300 pounds force per square inch for cherry. Thus, box joints are actually somewhat stronger than dovetail joints; box joints fail when the glue itself shears. Again, the effect of leverage in our design amplifies these load capacities; with a balanced design, the strength of a dovetail joint need not be a significant concern.
Wire gauge Music wire is sold by its own gauge scale; smaller numbers are thinner. Wire is cheaper in bulk, even for a single Chitarra, and varies in composition and quality; buy the best available but at a good price. Take care not to let the coil unspin and tangle.

| Gauge | Diameter | Length | Strength | Tension | Max Load |
| (in) | (feet/lb) | (min ksi) | (lbs) | (lbs) | |
| 00 | 0.008 | 5,853 | 399 | 7.3 | 20 |
| 0 | 0.009 | 4,624 | 393 | 9.3 | 25 |
| 1 | 0.010 | 3,746 | 387 | 11.4 | 30 |
| 2 | 0.011 | 3,096 | 382 | 13.8 | 36 |
| 3 | 0.012 | 2,601 | 377 | 16.5 | 43 |
| 4 | 0.013 | 2,217 | 373 | 19.3 | 50 |
| 5 | 0.014 | 1,911 | 369 | 22.4 | 57 |
| 6 | 0.016 | 1,464 | 362 | 29.2 | 73 |
Wire strength The length and strength columns are representative values, taken from Precision Brand Wire; the remaining columns depend on these values. Tension is given for a frequency of A 440 and a string that is 16" in length; see Metronome Online for an A 440 tuner. These tension values are proportional to the weight of a given length of wire, and best convey the "feel" of each gauge. ksi is kilopounds per square inch of cross-sectional area, a measure of ultimate tensile strength; this is the maximum load that a wire can bear under ideal conditions. In practice, wire breaks at smaller loads if it has been fatigued from bending.
Pull and pitch Tension and frequency are related by the formulas
Rules of thumb These formulas can be understood in terms of various rules of thumb: For a given tension, halving the length doubles the pitch (raises it one octave); this is how guitar frets work. For a given length, one doubles the pitch by quadrupling the tension. Individual 16" strings break within an octave above A 440, pretty much independent of their gauge; the higher gauges are under higher tension when they break. If all wires are tightened together, the wooden frame will probably break first. Clearly, it is safest tuning a Chitarra well below A 440; tuning down an octave divides the tension by four. On the other hand, the tone quality makes it tempting to tune to A 440 or so. One needs to be aware of the forces involved, and of how close the strings are to failure.
The dilemma For any of these gauges, wetter or thicker pasta will tend to hang between the strings until freed with a slap of the palm of a hand. Drier or thinner pasta falls through more readily, but more dramatically so with thinner or tighter wires. This is the dilemma: thin and tight will break the wires, while thick and high-pitched will break the frame. The choice of gauge is partly a function of one's stringing finesse, which my design attempts to support. I started with #5 after my first supplier dissuaded me from using #3. I then bought #6 in bulk, which works but is unnecessarily heavy, and doesn't cut as well as #5. I'm waiting for bulk #3 and #4 to arrive, for further experiments.
Wire holes The wire stitching through the wire holes in back is under tension, and begins to cut across the grain of the wood, more noticeably in softer woods. As this process evolves, the radius of turning increases until it stabilizes at a point where the wire can no longer cut the wood; the force of the wire tension is too far out of focus. I find that this is elegant, adding a "let it go, it's ok" philosophical detail to the design. If this bothers you, taper the holes, or use round head screws with smooth upper shanks to avoid cutting the wire, or use angled hitch pins.

Urban constraints I am an intermittent, casual urban woodworker. While I love the process, my projects are motivated by perceived necessity. There are constraints to working in an apartment, principally working space, storage, and dust, but these constraints are manageable.
Tools Aside from the ubiquitous and essential cordless drill, one develops a preference for hand tools, and neighborhood "cut to order" lumber shops. A plywood or MDF work surface is also essential, to convert existing space into a temporary workshop. Even the most basic corner vise is a great help for making corners.
Drill press The shop tool one most sorely misses is a drill press. There are various options for improving the alignment of hand drill work, all of which are adequate for this project, and none perfect. I instead bought a Proxxon Bench Drill Press TBM 115, which is a spectacular drill press on the scale of a handheld rotary tool.
Sand in the shower While the phrase "making sawdust" is as overused online as "sweet" is offline, my goal is to introduce as little sawdust as possible into my living quarters. An Australian girlfriend provided me with a crucial insight a few years ago, by sanding a project in a state of undress in my shower. One can of course also work clothed at a worktable, comfortably seated, and still take advantage of the dust containment and easy cleanup that a shower offers. Alternatively, get into the habit of sanding damp wood with wet/dry sandpaper, which spreads less dust and can yield superior results. One can, of course, easily combine these two ideas.
HSWP
Italian American Program
Their collection
includes a c. 1910 Chitarra, pictured.
Another period Chitarra 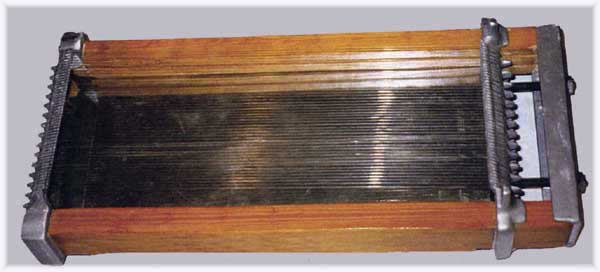
"There are
various models of the 'guitars'. The one shown here in the picture, is
perhaps one of the finer models, since it has also the "keys" necessary to
regulate the string tension (on the right of the photo)."
pastamakers.us 
Sur La Table
Two sources for Italian
Chitarras that resemble the one I own.
Fante's Kitchen
Wares Shop 
A U.S. made Chitarra
that looks as if it could be the best made commercial model.
Making a
Hammer Dulcimer
A representative web page on
making a hammer dulcimer, courtesy of the Smithsonian Institution.
Guide to
Installing New Strings 
Good instructions and pictures showing how you're supposed to
wrap wire around zither pins, in case you don't want to adopt my wire hole
cheat.
Song of the Sea
A Celtic folk music source in Bar Harbor, Maine, with a
knowledgeable staff and all the music hardware one needs to get started:
zither pins, matching #15 drill bit, tuning wrench, music wire. They are
familiar with Chitarras; if they are to believed, mine wasn't the strangest
call they get in a given 15 minutes.
International
Luthiers Supply
Great prices on zither pins and
bulk music wire. The zither pins are the shorter variant, but fine for
Chitarras. The music wire is described by diameter in inches; subtract 500
from the part number to get the gauge. The wire is in fact Röslau wire packaged by
Schaff International in a useful retaining brake (like a spool, only it
surrounds the wire). Call knowing exactly what you want.
Grainger
An online and
retail source for
Precision Brand Wire. Music wire gauges 3, 4, 5 are Grainger item
numbers 3L543, 3L545, 3L547, respectively.
Marshall-Newell Supply, Co.
Close-out
prices on music wire gauges 3 and 4
Precision Brand Wire.
Schaff International
Ltd.
Source for Röslau music wire. +1 847 438
4560.
The Instrument
Workshop
A wide selection of tuning pins.
"For an antique look, the bright (or blued) pins can be
oxidized by placing them in a brine (vinegar/salt) solution for a few
minutes, then rinsing them and leaving them on a paper towel to dry before
wiping them dry. The amount of time you wait before wiping them dry
determines the amount of oxidation. "
Bristol Valley
Hardwoods
An online source of maple, cherry,
walnut and other hardwoods, willing to surface, joint, and sand for very
reasonable prices. They will deliver pieces cut to specification, an urban
woodworker's dream. 13/16" by 3" ready-to-use cherry was $2.46 per (lineal)
foot, 13/16" by 3 1/2" ready-to-use cherry was $3.14 per (lineal) foot,
when I placed my order. Thus, the wood per single cherry Chitarra with an
8" by 16" cutting area costs under $12, plus a few minutes at $60 per hour
to cross cut, plus shipping. There is a $25 minimum to avoid extra handling
charges.
Woodcraft Supply 
Woodworking
supplies. Proxxon Bench Drill Press
TBM 115. The optional but essential Roehm chuck is widely described as
accepting drill bits up to 15/64"; this is a comedy of unchecked conversion
errors. The chuck appears to have been designed to accept 1/4" bits, and
was then described for its original metric market as accepting 6 mm bits.
This was translated for the boonies as 15/64". Whatever the actual story,
the chuck does accept 1/4" bits, permitting the use of a wide variety of
standard cutting tools with 1/4" shanks, such as router bits.
Miracle Exclusives 
Bears in the
Woods
Sources for the Samap hand stone grain mill,
which is still available but is no longer made. The effort required
approximates a visit to the gym, and without thicker stick-on pads the
bottom will scratch countertops, but the resulting flour is superior in
consistency to any alternative in this price range, and to any grinder I've
seen that doesn't use stone. If you have the space and money, go for one of
their electric stone grain mills. Don't get a cheap mill unless you plan to
mix in plenty of commercial flour; the stiff concrete dough they yield will
put you off the concept.
Commercial whole grain flours are
stale white flour and stale bran, without the germ, and make food taste
like a roll of unbleached paper towels fell in. Think overcooked brown
rice. Freshly milled whole grain flour with the coarse, bitter bran sifted
out has mechanical properties approaching that of white flour, but with far
more flavor and nutrition. It is a remarkable ingredient, too perishable to
be sold commercially.
Review of Fenix
restaurant, Richmond, Australia
"First, the salad
of caramelised pork belly cubes ($17): sweet and faintly chewy with a
jumble of intensely flavoured coconut 'noodles' (strips of jelly set with
agar and cut on an Italian pasta guitar, alla chitarra)."
Cooking by Hand, by Paul Bertolli, Random House International,
2003. ISBN 0609608932.
This book is truly inspiring; it
convinced me both to buy a stone flour mill, and to consider all whole
grains candidates for pasta, which lead directly into my renewed interest
in Chitarras. I follow his technique more closely than his recipes. This is
an extraordinary book for the way it opens up the reader's imagination to
new ways to think about food, and for its no-holds-barred encouragement of
the Italian impulse to be an artisan.
Italian Regional Cooking, by Ada Boni, Bonanza Books, 1969,
1990. ISBN 0517023857, 1131138430.
These are recipes translated into
English from Il Talismano Della Felicita`, Italy's Joy of
Cooking. Many of us found this book remaindered decades ago at a
pittance we could afford, to begin our love affairs with Italian cooking.
We all keep returning to it, for it is the real deal. It can still be found
remaindered or used, with some effort. There is also the Italian original,
a canonical reference along with La Scienza in cucina e l'Arte di
mangiar bene by Pellegrino Artusi.
Bugialli on Pasta, by Giuliano Bugialli, Stewart, Tabori &
Chang, 2000. ISBN 1556709846, 067162024X.
I took many lessons from Bugialli in
the days when he filled classes by word of mouth on Wooster Street. Though
he sold me my first Chitarra, he would undoubtedly take issue with my
slander of laminated pasta, and he has far more to say than I could ever
assimilate about coaxing the best results from a pasta machine. He is at
his core an historian, and his book is a tour de force of regional Italian
pasta techniques, required reading. His recipes can be exacting, but they
reward being followed closely in all respects except times, and can yield
sublime results. There are fresh pasta recipes in all of his books, notably
the Grandmother's Kerchiefs in Foods of Tuscany.
Think like a Chef, by Tom Colicchio, Crown Publishing Group,
2000. ISBN 0609604856.
Leading a new wave of more conceptually
written cookbooks, this was for some time my favorite book. He doesn't make
a big deal about the process of making fresh pasta, but he is strong on
what to put on top. The chapter on roasted tomatoes alone makes this book
invaluable.
The French Laundry Cookbook, by Thomas Keller, Artisan, 2000.
ISBN 157965126.
One wants to dismiss this book for its
overwhelming ostentation, its coffee table portraits of leisure class
skyscraper food, the importance of, well, just about everything, and the
utter impossibility of following its instructions to the letter. It is,
however, too brilliant not to be reckoned with. There is a notable section
on making agnolotti; from the rest one lifts individual techniques. I am
most influenced by his stock and sauce techniques, big-pot blanching, and
Beurre Monte for gently poaching lobster and other seafood. Try
lightly quoting a gumbo made from lobster stock, with poached lobster on
top, and see if you aren't stunned.
Chez Panisse: Pasta, Pizza, and Calzone, by Martine Labro,
Patricia Curtan, and Alice Waters, Random House, 1984, 1995. ISBN 0394530942, 0679755365.
A passionate discussion of pasta making,
including the advice which some readers have actually followed, "The
difference between a dough made with a regular market egg and one from a
homegrown chicken is dramatic." The recipes are intended to inspire
improvisation, not to be followed precisely. Indeed, copying them too
literally can come out as badly as copying a painting, it takes your eye
off what you should be seeing.
The Naked Chef, by Jamie Oliver, Penguin Books, 1999, 2000. ISBN
0718143604, 0786866179.
There's a reason this kid is successful;
he takes good food off its pedestal, so one can eat well every meal. This
perhaps the most exuberant and accessible place to start, if one is new to
making fresh pasta. Enthusiasm often prevails over regional accuracy.
Lulu's Provencal Table, by Richard Olney, Ten Speed Press, 2002.
ISBN 1580084001.
A case study of a vineyard family
kitchen, by an author who has been very influential on other chefs,
including a number of the other authors here. A short but spot-on pasta
section, eloquently siding with the do-not-overhandle camp: if it doesn't
look handmade, you might as well have bought it.
The Modern Art of Chinese Cooking, by Barbara Tropp, Morrow
Cookbooks, 1996. ISBN 0688146112.
My current favorite Chinese cookbook,
for its peerless chapter on noodles, dumplings and springrolls. Alternating
between Asian and Mediterranean noodles is a good way to better understand
the possibilities of both. I follow her instructions closely, and I love
her dumplings and sauces.
land of plenty, by Fuchsia Dunlop, W. W. Norton & Company, 2001. ISBN 0393051773.
A recent Sichuan cookbook with a good noodle section. The "Xie Laoban's Dan Dan Noodles" recipe alone is worth the price of the book: searing hot, with sesame paste, chopped meat, Sichuan pepper and Tianjin preserved vegetable as dominant flavors, it cries out for hearty whole grain homemade noodles.
The Book of Soba, by James Udesky, Kodansha International, 1995
ISBN 0870118609, 4770019564.
This is the definitive and over-the-top
account of making and using Japanese soba (buckwheat) noodles, for which an
eight-string-per-inch Chitarra is a handy alternative to the master knife
work he presumes. Making soba is too tricky to get right without his
crucial advice. Homemade soba from freshly ground buckwheat has an
astonishing flavor; one might actually prefer the blander taste of
commercial soba.